SOAPUI FOR TESTING WEB SERVICES
What is SoapUI?
SOAPUI is an open-source web service testing application for service-oriented architectures (SOA) and representational state transfers (REST). It enables you to rapidly and easily create and execute automated web service inspection , compliance, functional testing and load tests. Its used for Web Services Testing.
SoapUI (by Smartbear) is a great tool to test and demo SOAP/WSDL and REST/WADL-based web services.
What are web services?
Web services are web components that transfers data between client and server. Client sends a web request to the server and the server then responds to client. This response will differ based on the web service request type.
Web services are of two kinds: Simple Object Access Protocol (SOAP) and Representational State Transfer (REST).
The important components of the web services are:
1. WSDL – Web Service Description Language
2. SOAP – Simple Object Access Protocol
3. UDDI – Universal Description, Discovery and Integration
4. RDF – Resource Description Framework
1.WSDL(Web Services Description Language):
A WSDL is a document that should be written using XML.Validating webservices in only possible with WSDL document because to configure web services in SoapUI, WSDL document is mandatory. If the WSDL document is not valid, Immediately SoapUI will throw an exception error.
The advantage of using a WSDL is, it contains all the crucial information about the web service to be tested – Sample Request and Response, Web Service contents and much more.
2. SOAP(Simple Object Access Protocol):
Simple Object access protocol that uses XML to interact with web applications. It uses XML based content to communicate between two client machines across any network.
3. UDDI ( Universal Description, Discovery and Integration):
A new Webservice can also be registered through this. This is also the place where WSDL detailed definitions are found.
4 .RDF (Resource Description Framework):
The Resource Description Framework (RDF) is a family of World Wide Web Consortium (W3C) specifications originally designed as a metadata data model.
How to Install SoapUI on Windows:
Step1: open below link on browser
https://www.soapui.org/downloads/soapui.html then the page is appeared as shown in below.
https://www.soapui.org/downloads/soapui.html then the page is appeared as shown in below.

Step 2:After click on “Get it” button, file will be downloaded, Once you've downloaded the file just double-click on it. Then the installation Will be Starts like this.

After completing this Process. Next Page as shown in below.

Click on Next Button, it will ask you to accept our license agreement.

Step 3: After accepting the agreement just click on Next button, you'll be able to select the destination folder, By default it is set to C:\Program Files (x86)\SmartBear\SoapUI-5.3.0, but you can change the Destination folder.

Step 4: After select the destination, click on next button to continue the installation. After that next page gives to add some additional components,

Step 5: There are two components to install SOAPUI source files and Hermes installation. Based on your requirements you can install.
NOTE: Here for testing, you've to choose install Hermes, then you'll get the Hermes license agreement.

Step 6:After accepting the Hermes license Agreement just click Next button, Then specify the path to the directory where the tutorials will be installed.

Step 7:Then, you'll be able to select the Start Menu folder where you want to create SOAPUI short cut.

Step 8:Click on Next Button ,the next screen appeared like below

Step 9:Finally click on next, then the installation will starts.

Step 10:After Extracting the files, the installation should be finished and you should see the next screen.
Like

Once click on Finish the SOAPUI installation done Successfully, Now You are ready to use SOAPUI .
How to Use soapUI Tool for Testing SOAP web Service
Step 1:Create a new project. Follow the path: File >>New SOAP Project or just click anywhere in soapUI tool and use ‘Ctrl+N’ to create a new project.
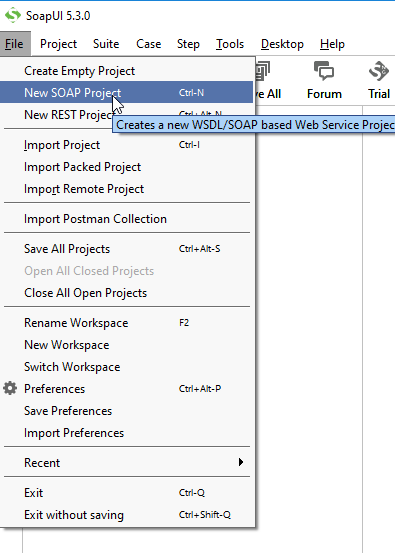
After clicking new SOAP project it will shows pop-up which looks like as shown in below.

Step 2: Now, name the project like SOAP Testing Project, and point it to a valid WSDL/WADL. In this tutorial, I am calling the project as “SOAP Testing Project” and pointing it to the sample WSDL file provided by soapUI .
For your convenience, I have given 2 sample WSDL URLs below. You can run either of these to get started with soapUI.
-
http://www.dneonline.com/calculator.asmx?wsdl
-
http://www.webservicex.net/medicareSupplier.asmx?WSDL
Once your ‘New SOAP Project’ window looks as shown in the screen grab below, click on ‘OK.’

Step 3. Based on the given WSDL source you use, soapUI will load the related definitions and configuration and will show up the operations in the Web Service. The screen will look like this,

You can double-click on the project name in the navigator to see the overview of any project and related details. As you become an advanced user of soapUI, this window provides some valuable information which you would need going forward.

Now let's Inspect the Web Service. Inspect the Sample Project WSDL by double clicking the CaluculatorSoap Interface Icon.


Step 4:Now, how to test the web services in soapUI tool!
Here,With all the interface operations shown in the WSDL navigator screen, navigate to the service request in the test layout tree and double-click on the Requests.


The Request/Response are by default set to XML format. You can click on ‘Raw’ tab in either Request or Response to get a full view of the HTTP request made to the server, and the response returned.

Creating Test Suite:
Step 1: Within the project, testers can create a test suite by performing a right click on the project.

Step 2: Enter the name of the test suite or By Default it gives TestSuite1 and press OK.

Step 3: The created test suite is displayed in the navigator pane as shown below. And The test Suite window opens in the Right side.

Creating Test Case:
Step 1: With in a test suite, we can create multiple tests by performing right click on the 'test suite' and choosing “New Test Case”.

Step 2: Enter the name of the test case and click OK.

Step 3: The created Test Case is displayed in the navigator pane as shown in below.

Step 4: We can insert a variety of test steps by clicking a right button on test steps and selecting an appropriate test step as shown in below.

NOTE: if you have to test a REST Web Service, you would select the REST Test Request. Here I am testing a SOAP Web Service. So, I am selecting SOAP Request.
Step 5: Enter the step name and click OK.

Step 6: After click ok, All the operations are listed, and user can select the operation that they would like to invoke.

There are two operations that will be listed. Both the Operations are the same except the SOAP version used.
1. CalculatorSoap – uses SOAP version 1.1 And
2. CalculatorSoap12 – uses SOAP version 1.2.
After Selecting required Operation, there will be displayed one pop up like this

After click on ok button then the Test step is added. Then the screen will appear like,

Enter the required fields i.e(?) with in the “?” we have to replace the values And click on run the response will show like this.

What is Assertion?
Asserts is verify the conditions of the test and decide whether test has failed or passed. A test is considered successful ONLY if it is completed without throwing any exception.
Here, we are verifying if the added sum is equal to 'Response sum' or not. If the sum is not matching with the response sum result that we provided, it will fail the test case.
How to test Assertion?
Step 1:click on the Assertion button the Screen will appeared like.

When clicking on Assertion(1) the image will be appear as shown in below

Step 2: click on the Add Assertion button i.e +, then the Next screen appeared like

Select the Source property here, I am selecting property content, and select contains.

Enter the Approximate or Estimated results here Then Click on Ok ,

Here, I am passing wrong value 25, then Click on ok button then it will throw an error,

If you passing Correct value 30 then it shows Soap response is valid in the Assertions.
For Testing RESTful Webservices in SOAPUI-Click here
Thanks & Regards,
Brahma Reddy chagani,
Technical Trainee,
MOURI Tech PVT LTD.
http://www.mouritech.com/
the blog is more useful and many important points are there.keep sharing more like this type of blog.
ReplyDeleteAmazon web services Training in Chennai
AWS Certification in Chennai
DevOps Training in Chennai
Best DevOps Training in Chennai
ccna course in Chennai
AWS Training in OMR
AWS Training in Adyar
Do you have a spam problem on this blog; I also am a blogger, and I was wondering your situation; many of us have developed some nice methods and we are looking to trade techniques with other folks, why not shoot me an e-mail if interested. epicor bpm
ReplyDeleteThank you so much for providing such a unique and descriptive analysis of Power BI and REST API.
ReplyDeletePowerbi Read Soap